

A common question we are asked on our IT helpdesk is how to change a signature in Outlook.
A signature is a block of text or an image that is automatically added to the end of each email you send. Microsoft Outlook signatures can be simple, or indeed as complex as you want them to be. From a plain text message to an html script containing images, adverts and can even produce analytics using products such as Exclaimer. Users will commonly need to update their signature when their job title or contact details change. Others might wish to regularly update their signature with their company’s latest offers.
So, how to get the best out of your Microsoft Outlook email signature? And how to change your Outlook signature on PC, Mac, Apple Ios and Android? Let’s take a look.
How to change your Outlook signature – general settings
Firstly, let’s look at where your Outlook signature settings are stored on each platform…
How to find your Outlook signature settings in Outlook for Windows Desktop
- Inside of Outlook for Windows, click on File.

- Click Options.
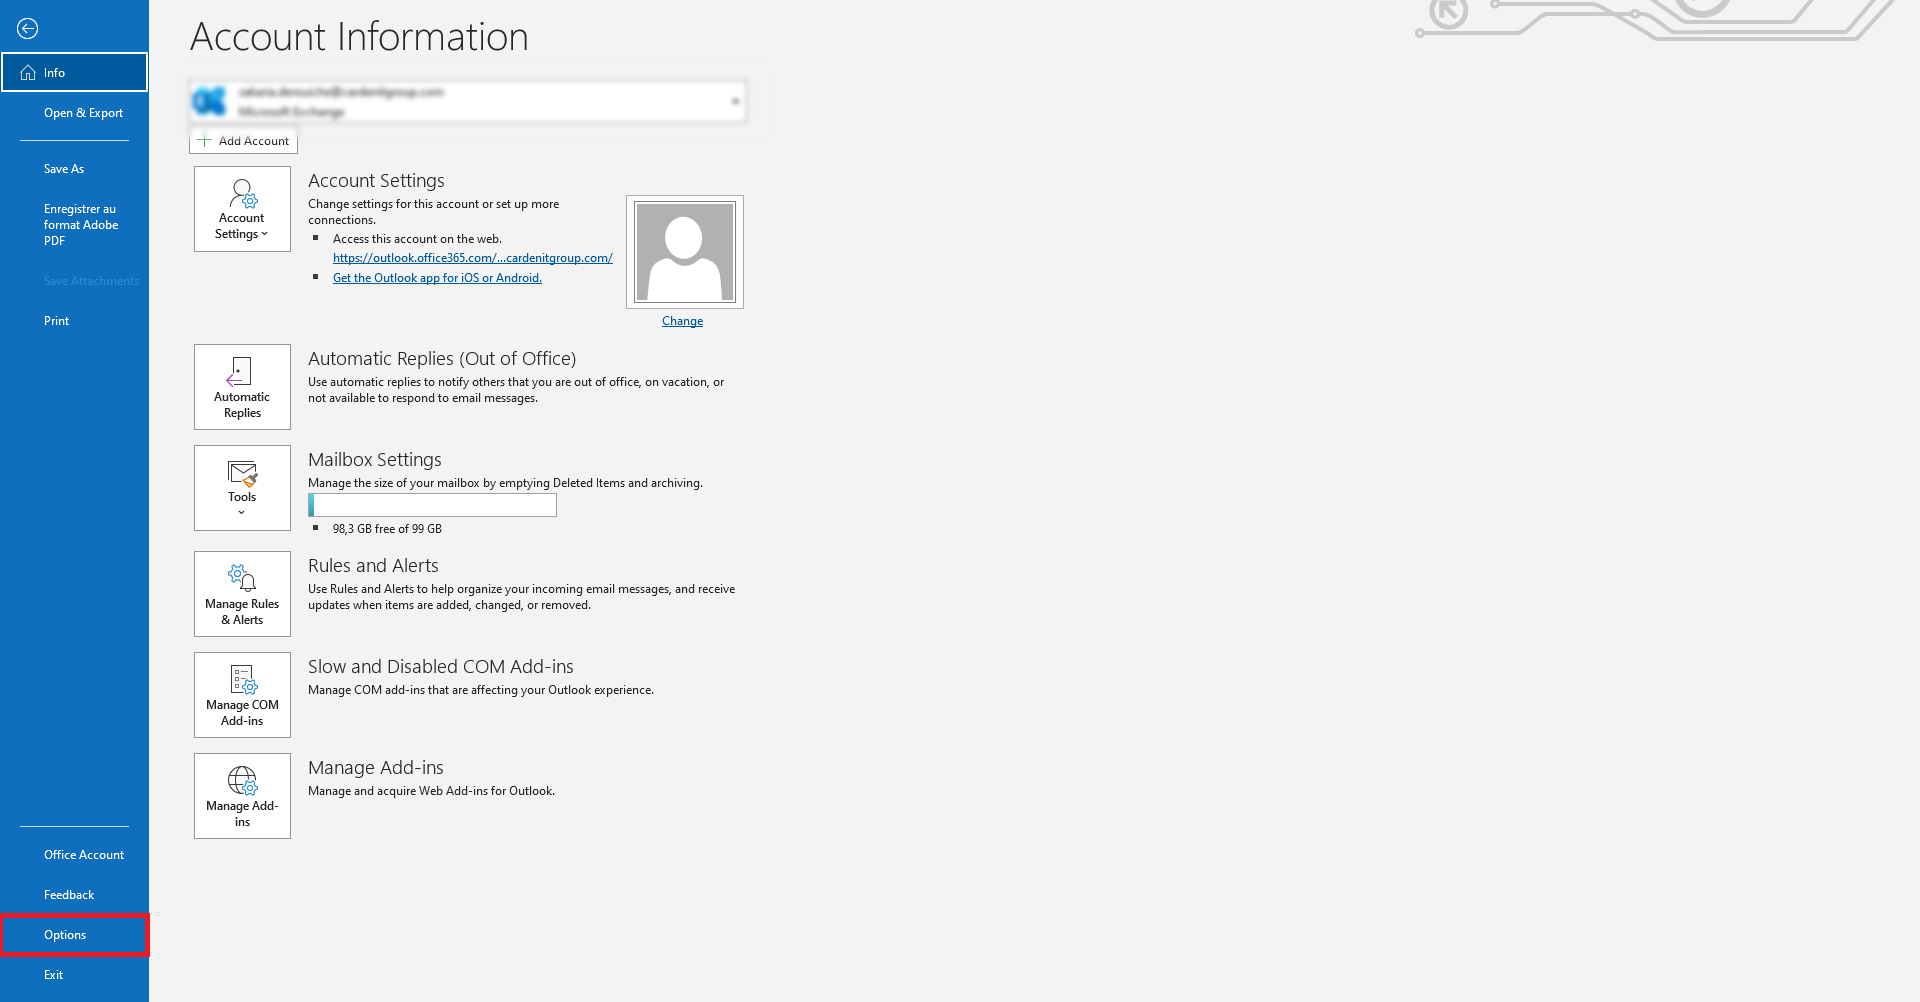
- Click Mail.
- Click Signatures.

- You can then edit your existing signature or click on “New” to add a new one
How to find your Outlook signature settings in Outlook for Mac
- Inside of Outlook for Mac, navigate to the “Outlook” drop-down menu.
- Then click Preferences > Email > Signatures.
- You can then edit your existing signature or click on the “+” icon to add a new one
How to find your Outlook signature settings in Outlook for Apple iOS
- Inside of the Outlook app, tap on your profile icon in the upper-left corner.
- Tap the Settings icon (the gear symbol).
- Scroll down to the Mail section of the settings.
- Tap on “Signature”.
- In the signature screen, you can edit or add a signature
How to find your Outlook signature settings in Outlook for Android
- Inside the outlook app, click on the settings icon (the gear symbol).
- Scroll down on the settings menu and click “Settings”.
- Under Settings, click on the “Signature” option.
How to edit your Outlook signature
- If you have multiple accounts connected, you can select which accounts’ signature you wish to edit.
- You can edit your signature using the test box.
- When you are finished, click “Save”, then “OK”.
How to include images in your signature
When you are editing your email signature, depending on your platform you should see this icon in the top corner . You can click this icon and upload an image file to your signature.
It is recommended that you use either a PNG or JPEG image file and that your overall image is scaled down to an appropriate size for an email signature.
How to include links in your signature
When you are editing your email signature, depending on your platform you should see this icon in the top corner . You can click this icon and add a hyperlink to your email signature. Just like in Microsoft Word, if you want to hyperlink a specific word or phrase in the signature, highlight the text before clicking the hyperlink icon.
How to test your signature
The easiest way to test that your signature is displaying correctly is to ask a friend or colleague. Send them a test email, have them take a screenshot of the signature and send it back to you. Check that the signature displays as you expected it to and that any images are the correct size.
How to add the same signature to all emails across all your devices with Exclaimer
Many businesses will have a standard signature which is used across all emails. This can help customers and suppliers verify that the email is genuine as well as providing a cohesive brand identity. Exclaimer allows you to manage email signatures across multiple accounts. These signatures are also known as Server-Side Signatures as they are applied to emails at the server level, irrespective of which device or client was used to send the email.
- Once you have set up Exclaimer connected it to Office 365 (also known as Microsoft365), and created a signature, select “Configuration” from the left-hand side.
- On the right-hand side, Apply Signatures should be enabled providing that the Exclaimer authorization and syncing process have been completed.
- By default, the signatures will apply to emails sent from all devices (including mobiles).
- There are additional options which govern whether the signature is displayed in your client before you send the email
How to add more advanced options in your signature with Exclaimer
Exclaimer also allows you to have set email signature templates which can autofill details about the sender dynamically. One of the most common ways this is used is to pull data from Active Directory and fill in the signature using those. For example, the signature might include qualifications, job role, or team information and you want this information to update dynamically and automatically for all members of your organisation rather than having to design a separate signature for each team member.
N.B. You will need Global Administrator credentials to do this.
- Sign up for an Exclaimer account and create a signature template that includes the relevant fields, such as the user’s name, job title, phone number, and email address.
- Connect Exclaimer to your email server or cloud email service (such as Microsoft 365 or Google Workspace) so that it can automatically apply the signature to each user’s outgoing emails.
- Use Exclaimer’s rules engine to define conditions that determine when and how the signature is applied. For example, you can create a rule that applies the signature to all emails sent from your team members’ work email addresses.
- To ensure that the signature updates dynamically when a user’s job title changes, you can use Exclaimer’s Active Directory integration. This will allow Exclaimer to pull the user’s job title directly from Active Directory and apply it to the signature automatically.
- Finally, you can also use Exclaimer’s analytics and reporting features to monitor the usage of the signature and identify any issues that need to be addressed.
Add comment